|
. |
Hinge
Position
 The
next stage is to position the vertical lines between the two that
you have just drawn for each hinge as you would when fitting the
hinges to the door. Different to the door though, this line on
the doorframe does more than just set the hinge position for
recessing, it also governs the position of the door in relation to
the shoulder of the rebate. Too close and the door will
rub against it, preventing it from closing properly, giving it a
tendency to spring open. If it's too far, you end up with a gap
that's too wide when the door is closed, so getting it right is
important. Getting it wrong means The
next stage is to position the vertical lines between the two that
you have just drawn for each hinge as you would when fitting the
hinges to the door. Different to the door though, this line on
the doorframe does more than just set the hinge position for
recessing, it also governs the position of the door in relation to
the shoulder of the rebate. Too close and the door will
rub against it, preventing it from closing properly, giving it a
tendency to spring open. If it's too far, you end up with a gap
that's too wide when the door is closed, so getting it right is
important. Getting it wrong means  spending
time adjusting as well as making a mess of the door frame if the
hinge needs repositioning. spending
time adjusting as well as making a mess of the door frame if the
hinge needs repositioning.
Getting
this position correct is actually quite simple; Measuring from the
edge of the door to the edge of the hinge would give the exact
distance from the outside face of the door to the shoulder of the
rebate when the door is fitted. But because there must be
clearance between them for free movement and for the build up of
paint, 2mm should be added to the measurement.
When
this has been done, add vertical lines using the same measure to the
second and third hinge.
Cutting
Out the Casing
Using
the same procedure as with the door, cut out the recesses for the
hinges into the doorframe, testing for fit as your proceed.
Having a spare hinge for this job is a good idea.
Hanging
With
the door in the open position (at 90 degrees), raise it up so that
the open hinges correspond to the recesses that you have formed in
the doorframe. Beginning at the top and using a bradawl, make a
pilot hole for one screw only before inset it. (If the doorframe is
hardwood, you will need to drill pilot holes for the screws).
Do the same with the bottom and centre hinges. Do not at this
point insert the remaining screws as the door may need slight
adjustments. Try closing the door and check for fit at the top, sides
and between the door face and rebate. If all is correct insert
the remaining screws.
If
you find that after inserting all the screws, the vertical gaps are
no longer equal, i.e., 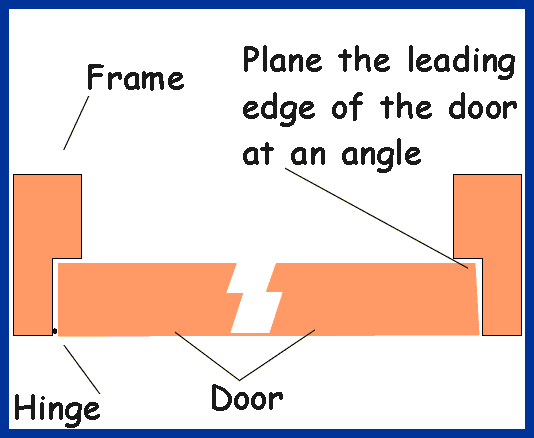 the
hinge side gap has been reduced and the lock side increased or
vice-versa. This indicates that the recesses for the hinges are
not accurate and have been set-in too deep or not deep enough and
adjustments must be made by packing out slightly, or sinking in
further depending on the problem. the
hinge side gap has been reduced and the lock side increased or
vice-versa. This indicates that the recesses for the hinges are
not accurate and have been set-in too deep or not deep enough and
adjustments must be made by packing out slightly, or sinking in
further depending on the problem.
If
you find that though the two vertical gaps are correct, the door
still catches as it closes on the lock side. This is usually due
to the increase radius of the door when closing at its 'leading
edge'. To overcome this, the door should be removed and planed
at a slight angle to compensate for the difference to the full length
of the door, so that the leading edge has a 2mm gap between it and
the frame. |
|

