|
. |
Fixing
Time
As
outlined in 'Features' the
prepared door casing
has a cross member to its base and has also been braced, making it
into a rigid framework.
Before
permanently fixing the casing in place, it's always better to run  some
checks first. This can be done by temporary securing the casing in
position, using packing pieces or wedges. (Trap at the top only, at
the ends of the head). With the casing held in place, first ensure
that the head is level, then, place your 'straightedge' onto the
inside face of the jamb and check that it is straight. Then, place
the spirit level on to the 'straightedge' and check for being plumb.
The
jamb that you will fix first, is the one that the hinges will be
fitted to. In addition to ensuring that this jamb is plumb and
that the head level, check too that the outside edge is also plumb
and that the width of the jamb is central to the thickness of the wall.
With
the jamb in this position, insert a nail at the bottom fixing point,
central to the casing and leave the head protruding. Next,
insert a nail at the top, checking that nothing has moved as you take
each step. Finally, insert a nail at the central fixing point,
remembering, at this stage, each nail is central to the jamb and left protruding.
The
jamb is now fixed in its permanent position and if you are satisfied
that the jamb is correct, insert the remaining nails and drive them home.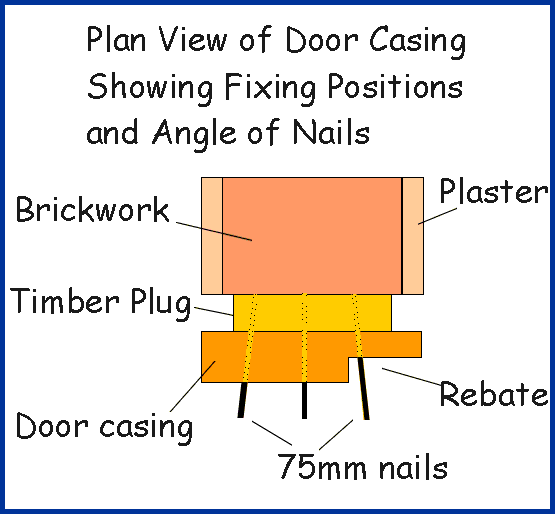 On
a standard door casing you should use three 75mm oval nails per
fixing point. The two nails that you insert in addition to the
central nail, should go in at a slight angle, this will give better
grip because the nail is going into the 'end grain' of the timber plug.
Now
adjust the head so that it and the opposite jamb are central to the
wall and inset a nail at the bottom fixing point. The next
procedure is to visually compare the two jambs, so that they both
align. To do this, requires you to cast your line of vision
over the edge of the fixed jamb, in such a way that you can also see
the edge of the unfixed jamb. The correct position to achieve this is
with your head up to the wall behind the fixed jamb. When you have
the edges of both jambs in your sight, look up and down to make the
comparison, adjusting the unfixed jamb, until the two compare
exactly. When this is done, insert a nail at the top fixing point so
that it, (only just) secures the jamb at this point. Do not fit the
centre nail at this time.
The
cross member and braces that you fitted earlier can now be removed
and the door can be hung as described in Techniques. When the door is
on with all the screws in the hinges, check all your gaps as outlined
in 'Fitting Internal Doors'.
Before
you can insert the remainder of the nails, one last check should be
made to see if the 'face' of the door's closing stile is parallel to
the rebate. To do this, close the door, so that it touches the
rebate. Now check for a gap between the stile, from top to bottom, in
relation to the rebate. If both surfaces meet from top to bottom,
then your door fits correctly. However, if you have a diminishing
gap, then either the door is slightly twisted, or the casing jambs
are not perfectly aligned.
As
this result is fairly predictable, provisions have been made in
these instructions to overcome and remedy this problem.
Retract
the protruding top nail, just enough so that it releases the jamb.
Now hold the door in the closed position and adjust the door casing
from the loosened top corner so that the face of the door stile is
parallel with the rebate.
With
the casing in the correct position insert a second nail to the top
fixing point, next to the one that you have just retracted.
There is good reason for doing this. If you have moved the
casing only slightly to correct the alignment, then to re-inserting
the same nail would have the tendency to pull the casing back to the
incorrect position by re-entering the original nail hole.
Now
that the door casing is correctly fitted, the remainder of the nails
can now inserted. The nails should also be driven below the
timber surface and filled with a suitable filler. |
|
